Covers and All Covers and All
  • All Products
  • Industrial Covers
  • Custom Covers
  • Solar Shades
  • Cushion & Pillow Covers
  • Custom Tarps
Subscribe
Recent Comments
    Recent Posts
    • Top-Rated Sectional Sofa Covers to Protect Against Pollen 
    • Butter Me Up: How to Curate a Spring Butterfly Garden
    • 9 Backyard Spring Ideas for a Better Outdoor Lifestyle
    • Spring Break Bonanza: 9 Fun Activities for Staycation Spring Breakers
    • Spring Fresh: 4 Easy to Prepare Spring Dishes
    Featured Posts
    • Top-Rated Sectional Sofa Covers to Protect Against Pollen 1
      Top-Rated Sectional Sofa Covers to Protect Against Pollen 
      • April 6, 2026
    • Butter Me Up_ How to Curate a Spring Butterfly Garden 2
      Butter Me Up: How to Curate a Spring Butterfly Garden
      • April 3, 2026
    • 9 Backyard Spring Ideas for a Better Outdoor Lifestyle 3
      9 Backyard Spring Ideas for a Better Outdoor Lifestyle
      • April 2, 2026
    • Spring Break Bonanza_ 9 Fun Activities for Staycation Spring Breakers 4
      Spring Break Bonanza: 9 Fun Activities for Staycation Spring Breakers
      • April 1, 2026
    • Spring Fresh_ 4 Easy Spring Dishes 5
      Spring Fresh: 4 Easy to Prepare Spring Dishes
      • March 31, 2026
    Categories
    • Covering Questions
    • Eco-Conscious
    • Gift Ideas
    • Home & Living
    • How to Guides & Products
    • Landscaping & Gardening
    • Outdoor Lifestyle
    • Patio Furniture Covers
    • Seasons & Occasions
    • Social Hub
    • Uncategorized
    ×

      0
      0
      216
      0
      Covers and All
      Subscribe
      ×

        Covers and All
        • All Products
        • Industrial Covers
        • Custom Covers
        • Solar Shades
        • Cushion & Pillow Covers
        • Custom Tarps
        • Seasons & Occasions

        Jolly Jack-O’-Lanterns: 10 Steps to Follow for Pumpkin Carving Perfection

        • October 20, 2021
        • admin
        Total
        3
        Shares
        0
        0
        3

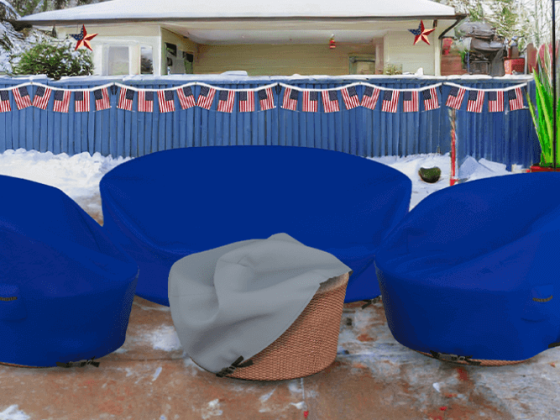
        With Halloween around the corner, it’s time to make the most of the spooky jamboree. There’s no better way to begin the festivities than with carving a Jack O’ Lantern. Carved pumpkin lanterns are perfectly spooky decorations for your next Halloween bash. Decorate your front porch or dinner table with Halloween or fall themed outdoor cushion covers and table covers and place Jack-O’-Lanterns outdoors to welcome trick-or-treaters.

        Whether you are an amateur pumpkin carver or adept sculptor, here are some ways to improve your carving skills before the big day. 


        Pick the Perfect Pumpkin

        Pick the perfect pumpkin will make the carving process much easier. A medium-sized, round pumpkin with no deep ridges is the easiest to sculpt. Look for the pumpkin with the most staying potential. A good choice is one that is solid to touch with a strong, sturdy green stem. A healthy pumpkin should also have a fresh aroma.


        Set Up Your Carving Station

        Sculpting a Jack-O’-Lantern is a messy task. You will be scooping the pulp and seeds out of the pumpkin. Opt for outdoor carving stations whenever possible so you can avoid creating a mess or staining your counters and furniture.

        Lay down a tarp to prevent the gloppy mess from ruining your porch. Cover tabletops with a waterproof & sturdy table cover to keep it spick & span and miles away from staining & soiling.


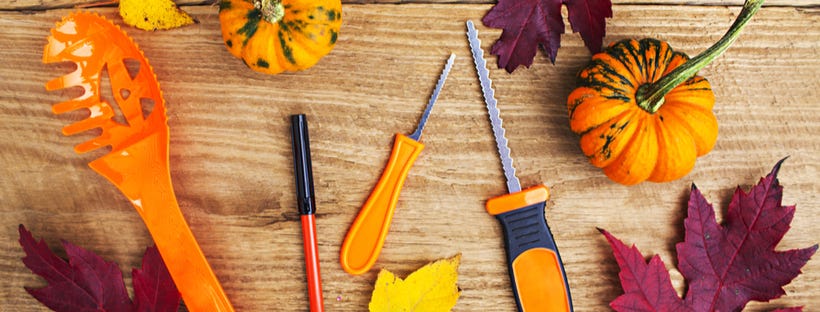
        Collect the Supplies You Need

        After setting up the space, it’s time to get your carving tools ready to scoop and scrape creepy carvings. Here are some of the supplies/tools straight out of your kitchen to get you started with sculpting:

        •       Sharpie or a black permanent marker to trace your designs.
        •       Ladle or ice cream scoop to hollow out the pumpkin.
        •       Spoon to clean the rest of the pumpkin pulp.
        •       Kitchen towel to clean your hands.
        •       Fillet knife with a thin, narrow blade to pierce through tough parts of the pumpkin.
        •       Paring knife just the right size and shape for carving.
        •       Lemon zester and vegetable peeler to create decorative effects and textures.
        •       Melon ballers can also be used to make eyeballs.
        •       Pumpkin carving stencil to etch the design easily.


        Safety & Sharp Tools

        As pumpkin sculpting does involve the use of sharp tools such as knives and other pointy objects, it is advised to handle them with utmost care. If children are involved, use the standard pumpkin carving kit with plastic scrapers and scoops.

        Take all necessary precautions such as wearing rubber gloves while carving. Painting your pumpkin is a kid-friendly alternative if you want to keep little hands away from sharp objects. 


        Carving Placement

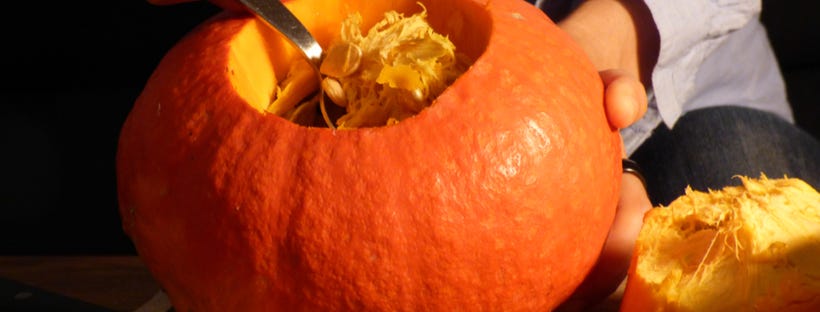
        Unless you are making the classic Jack-O’-Lantern with the top cut out, it is recommended to cut a hole at the bottom to pull out all the goop. The classic top-carving structurally weakens the pumpkin and speeds up the rotting process. Alternatively, you can create a square or diamond-shaped opening at the back to scoop the pulp out and then place the piece back when you are done.

        Next, use scraping tools to thin out the pumpkin’s inner walls. The walls shouldn’t be thicker than 3/4 an inch. The thinner the walls, the better it will be for the pumpkin’s shelf life.

        Now, the squash is ready to be carved. Choose the side that is smoothest, softest, scratch & dark spots free for hassle-free chiseling.


        Draw or Use Stencils

        Once you start carving, there’s no going back, so plan your design beforehand. If you are not confident with your drawing skills, use a pumpkin carving stencil. Tape the print-out directly over the fruit and use a needle or pin to prick the design in the pumpkin. Alternatively, you can use a transfer paper and outline the pattern directly onto your squash.

        After you are done drawing your creepy face, use the fillet knife to gently pierce through the holes to get the carving started. Make sure you keep your hands firm and stable during the whole process to create an impeccable piece of art. 


        Secure Broken Pieces with Toothpicks

        Carving does entail a lot of patience and expertise. After successfully transferring the pattern onto the pumpkin, perfecting little nuances becomes harder as it tends to weaken the squash. If your pattern pieces fall off or break during the process, fret not.  You can easily use toothpicks to fix and secure the broken pieces onto the lantern. 


        Preserve Your Ghoulish Grins

        Once you’ve carved your pumpkin, you need to preserve it from dehydration, moisture, and mold, which are the main causes of the rotting process. The best thing you can do is keep the pumpkin away from direct sunlight.

        Wrap it up with plastic and store it in the refrigerator. The application of petroleum jelly on its outer and inner surface helps prevent the gourd from getting dehydrated. To further slow the decaying process, you can even use hairspray. Spraying the pumpkin inside and out with a bathroom cleaner containing bleach also increases its shelf life and protects it from rotting too quickly.


        Save the Pulp and Seeds

        Pumpkin guts and seeds make for a delicious seasonal snack. Save these items to enjoy amazing nutritional value and delectable taste. Separate the pumpkin flesh and string from the seeds. Clean and roast the seeds for healthy snacking or you can use them in everything including bagel seasoning, cinnamon sugar, or even pumpkin spice.

        For the pulp, you can turn it into a puree to prepare risotto, soups, and other Halloween recipes. You can also use this nutritive ingredient to bake some delicious desserts such as cheesecakes, ice creams, cupcakes, quick bread, pies, and more.

        You can even get creative with pumpkin skin too. Bake or dehydrate the skin and turn it into chips. Sprinkle with some salt and savor them with a tasty dipping or dust with cinnamon/sugar to turn them into candies.


        Use Votive Candles or Tea Lights

        Give your Jack-O’-Lanterns a spooky glow and animate the carved characters. Illuminate them with votive candles or tea lights. Set the candles inside the pumpkin where the surface seems flat and not wobbly.

        Make sure there is at least an inch of distance between the top of the candle wick and the pumpkin lid, or else the walls will start to cook up quickly. You can even switch to short candles or tea lights. For safety, use long lighters to light the wicks.

        To upgrade your Jack-o-lanterns, you can even go for green Christmas lights or battery-operated LEDs to give your eerie carvings a ghoulish feel.

        Total
        3
        Shares
        Share 0
        Tweet 0
        Pin it 3
        Previous Article
        • How to Guides & Products
        • Seasons & Occasions

        Dress Up Delight: DIY Halloween Costumes Your Family Will Love

        • October 19, 2021
        • admin
        View Post
        Next Article
        • Seasons & Occasions

        Happy Hauntings: 10 Tips for Building a DIY Haunted House

        • October 21, 2021
        • admin
        View Post
        You May Also Like
        Top-Rated Sectional Sofa Covers to Protect Against Pollen
        View Post
        • Seasons & Occasions

        Top-Rated Sectional Sofa Covers to Protect Against Pollen 

        • admin
        • April 6, 2026
        Spring Break Bonanza_ 9 Fun Activities for Staycation Spring Breakers
        View Post
        • Seasons & Occasions

        Spring Break Bonanza: 9 Fun Activities for Staycation Spring Breakers

        • admin
        • April 1, 2026
        Spring Fresh_ 4 Easy Spring Dishes
        View Post
        • Seasons & Occasions

        Spring Fresh: 4 Easy to Prepare Spring Dishes

        • admin
        • March 31, 2026
        Why late March is the worst time to leave patio furniture uncovered
        View Post
        • Seasons & Occasions

        Why late March is the worst time to leave patio furniture uncovered

        • admin
        • March 30, 2026
        5 Types of Patio Furniture Covers That Handle U.S. Spring Weather Best.
        View Post
        • Seasons & Occasions

        5 Types Of Patio Furniture Covers For US Spring

        • admin
        • March 23, 2026
        How to Use Heavy-Duty Tarps This Spring for Maximum Protection.
        View Post
        • Seasons & Occasions

        How to Use Heavy-Duty Tarps This Spring for Maximum Protection

        • admin
        • March 16, 2026
        This St. Patrick’s Day, Invest in Protection That Pays Off
        View Post
        • Seasons & Occasions

        This St. Patrick’s Day, Invest in Protection That Pays Off

        • admin
        • March 9, 2026
        Why Cushions & Pillow Covers Are a Smart Investment This Spring
        View Post
        • Seasons & Occasions

        Why Cushions & Pillow Covers Are a Smart Investment This Spring 

        • admin
        • March 2, 2026

        Leave a Reply Cancel reply

        Your email address will not be published. Required fields are marked *

        − 3 = 2

          Shop by Category


        • Patio Furniture Covers
          Patio Furniture Covers

        • Pillow & Cushion Covers
          Pillow & Cushion Covers

        • Grill & Firepit Covers
          Grill & Firepit Covers

        • Custom Covers
          Custom Covers
        Categories
        • Covering Questions (3)
        • Eco-Conscious (5)
        • Gift Ideas (8)
        • Home & Living (188)
        • How to Guides & Products (52)
        • Landscaping & Gardening (9)
        • Outdoor Lifestyle (230)
        • Patio Furniture Covers (1)
        • Seasons & Occasions (189)
        • Social Hub (1)
        • Uncategorized (44)
        Recent Posts
        • Why late March is the worst time to leave patio furniture uncovered
          Why late March is the worst time to leave patio furniture uncovered
          • March 30, 2026
        • Creative Sun Shade Installation Ideas: The Ultimate Guide
          How to mount a shade sail: the definitive guide for installation
          • March 24, 2026
        • 5 Types of Patio Furniture Covers That Handle U.S. Spring Weather Best.
          5 Types Of Patio Furniture Covers For US Spring
          • March 23, 2026
        Archive
        • April 2026
        • March 2026
        • February 2026
        • January 2026
        • December 2025
        • November 2025

        About Covers and All

        We provide high quality custom-made cover solutions with a wide range of UV-resistant fabrics for outdoor use. We offer water resistant covers in a variety of colors for a year-round protection for virtually any item.

        Company Information

        • Home
        • About Us
        • Sitemap
        • FAQs
        • Special Offers
        • Our Blog
        • How To Measure
        • Our Fabrics
        • Commercial Sales
        • Customer Reviews
        • Return Policy
        • So far we've covered
        • Gift Cards
        • COVID-19 Measures
        • Shipping Policy
        • Privacy Policy
        • Terms and Conditions
        • Order Tracking
        • International Shipping
        • Affiliate Program
        • Home
        • Sitemap
        • Privacy
        • Terms
        • Our Blog
        •  
          Location: Suwanee, GA 30024, USA

        •  
          Reach us by Phone: 800-260-2829

        •  
          Email Us: Contact Us

        © 2026 coversandall.com. All Rights Reserved.